Best CPR and First Aid Training Kits in Canada for Schools and Community Programs
The best time to learn lifesaving skills is before you ever need them. Across Canadian schools, sport clubs, libraries, and newcomer centres, instructors are trying to do exactly that, often with tight budgets and limited storage. The right CPR and first aid training kits make the difference between a class that feels abstract and one where learners walk out confident, hands already tuned to the rhythm of compressions and the logic of an automated external defibrillator. After years setting up courses from gym floors to church basements, I have learned what holds up, what fails early, and what actually helps participants remember once the session ends.
What “good” looks like in a training kit
The core elements rarely change, but details matter. If you teach in a high school one day and a seniors’ centre the next, you need equipment that travels well, cleans quickly between groups, and provides clear feedback without distracting from the basics. In Canada, most community courses target CPR-C and AED for lay responders, while secondary schools often align with provincial curriculum outcomes and local board policies. Instructors working with health sciences students or first responders run BLS-level practice with a higher performance bar. Your kit should flex across those use cases.
A complete CPR and first aid setup for schools and community programs usually centres on three pillars: manikins for high-quality compressions and ventilations, AED training equipment that mirrors the devices in local buildings, and instructor support items that keep classes safe, efficient, and consistent.
The spine of any program: CPR training manikins
A good manikin trains hands as much as heads. Learners should feel correct chest recoil, measure depth in real time, and hear or see cues that cement the cadence of 100 to 120 compressions per minute. In Canadian classrooms, the most common brands you will run into are Prestan, Laerdal, Brayden, and Practi-Man. All have models appropriate for schools, and each offers trade-offs that matter if you are buying for a board or a municipal program.
Prestan’s Ultralite and Professional Series are popular in community settings because they are light, stack neatly, and use simple clicker feedback for depth. The Ultralites travel well for pop-up programs, yet they still take a beating in gym environments. The Professional Series adds visual depth indicators and, in some packages, rate monitors on the torso. Consumables cost less than many competitors, which helps when you run dozens of classes a year. Prices vary widely by supplier and currency shifts, but in Canada you often see single adult units in the few-hundred-dollar range, with four-packs for classrooms landing in the low-to-mid thousands.
Laerdal’s Little Anne QCPR and Resusci line raise the bar on feedback. With app-based metrics, instructors can see compression fraction, depth, rate, and ventilation volumes live, then share scores to drive peer coaching. For BLS courses, that performance data nudges learners toward guideline targets in a way a simple clicker cannot. The trade-off is cost and a slightly heavier carry. Expect to pay more for QCPR-capable units, and plan for device management if you use the apps in environments without solid Wi-Fi. Many programs run a mixed fleet, using QCPR manikins at stations for advanced assessment and simpler manikins for general practice.
Brayden’s LED-illuminated models visualize blood flow when compressions hit the mark. In youth programs, that immediate, striking feedback lands quickly. It is less granular than app analytics but more engaging than a torso with a clicker. Practi-Man often appeals to budget-conscious buyers with dual adult and child settings on one unit, reducing the number of torsos needed for variant practice. If storage is your pain point, that duality helps.
For Canadian schools, durability, weight, and cleanability usually carry more weight than hyper-detailed metrics. In my field notes, manikins with replaceable, low-cost airways and wipeable surfaces win out when a class rotates through four student groups per hour. Units that rely on proprietary lungs with higher per-use costs can surprise you when you calculate the total cost of ownership beyond the first year.
Matching AED trainers to the devices people will actually see
AED training devices do not deliver shocks, but realism still matters. In Canada, you will commonly encounter ZOLL, Philips, Physio-Control/LIFEPAK, Cardiac Science/GE, and HeartSine devices in arenas, schools, recreation centres, and municipal buildings. When possible, choose AED trainers that simulate the same pad placement diagrams, voice prompts, and button layouts. That way, a learner who finishes your class can walk up to the wall unit in their gym and recognize the workflow immediately.
Good AED trainers let you control scenarios with a remote, so instructors can introduce a shock-advised rhythm, no-shock rhythms, low battery prompts, and poor pad contact. Volume control helps in noisy gyms. Child mode or pediatric pads are useful if you teach parents, coaches, and lifeguards. Many trainers ship in bundles with spare pads, which is essential because adhesive degrades and lint kills stickiness. Real-world price ranges in Canada for capable trainers run from the low hundreds to just under a thousand dollars depending on brand and feature set. If you teach at scale, consider a class set of three to four trainers for 24 students, allowing station work that keeps hands busy and dead time minimal.
A quick word on standards: training AEDs are not medical devices, so they do not require CSA approvals the way clinical equipment does. Still, buy from reputable Canadian distributors or established manufacturers that support their devices with replacement pads and cables for years, not months. It is painful to retire otherwise good trainers because you cannot source consumables.
Beyond CPR: what complete first aid training kits should carry
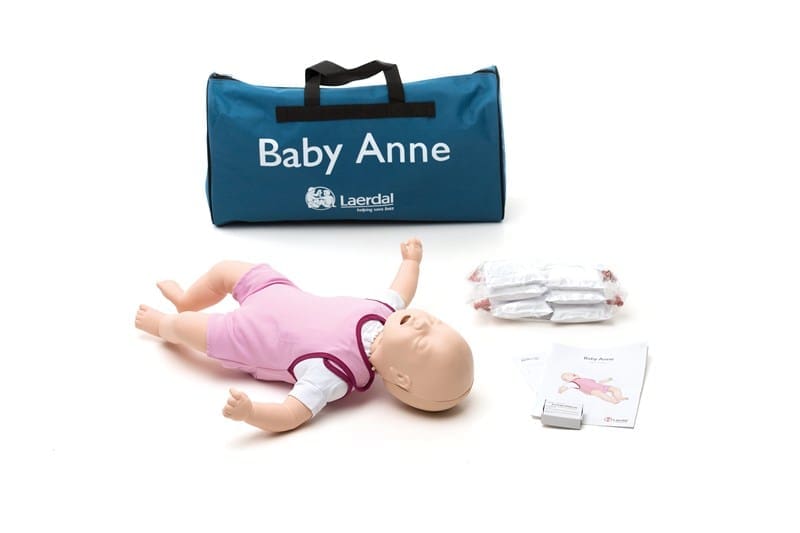
CPR is central, yet school and community courses also drill bleeding control, choking relief, and basic wound care. For bleeding, I avoid toy tourniquets. Even in entry-level programs where learners do not become certified in tactical medicine, practicing with a real, windlass-based tourniquet builds competence fast. Pair that with compressed gauze for wound packing practice on a foam limb or trainer pad. For choking, foam choking vests are helpful, but you can teach adult back blows and abdominal thrusts safely with spotter techniques if budgets are tight. For infant choking, a dedicated infant manikin is the safest and clearest option.
Classroom first aid kits should also cover gloves in multiple sizes, training barriers or face shields for rescue breaths, disinfectant wipes safe for plastics, disposable lungs or airways if your manikins require them, and a hand hygiene station at the door. If you integrate naloxone awareness in secondary schools or community centres, check your local public health unit for free or low-cost training kits and props. Several provincial programs provide sample nasal devices for demonstration only.
A concise shopping checklist for Canadian programs
- Adult, child, and infant CPR training manikins in a ratio of about one unit per three to four learners
- AED training equipment Canada models that mirror local public-access AEDs, plus spare training pads
- Barriers, training lungs or valves, and nitrile gloves in at least two sizes
- Bleeding control trainers with a windlass tourniquet and packable wound simulators
- Instructor tools: metronome or app, disinfectants compatible with plastics, carry cases, and bilingual handouts
Sizing kits to the room, not the brochure
Distributor packages often show glossy class sets that look perfect on a website. In the field, the best size is the one that keeps every learner moving. For a grade 10 class of 28 students, six adult torsos, two infants, and two AED trainers allow four stations that rotate every 10 minutes. That rhythm leaves time for demonstration and debrief without parking anyone in a chair. In a library evening course with 12 participants, three adult torsos, one child, one infant, and a single AED trainer are usually enough, provided you plan a second rotation for AED scenarios.
Storage is its own constraint. A four-pack of adult torsos in a rolling case fits in most school closets. Add a soft case for infants and AED trainers, and you can move the whole course on a cart. In community centres that share spaces, ensure your kit locks and label it with contact details. I have seen more than one program lose AED trainer pads to well-meaning staff who borrowed them for mock drills.
On feedback technology and when to use it
Digital feedback can raise performance. Devices like Laerdal QCPR or CPR feedback pucks quantify depth, rate, and recoil. For BLS or healthcare cohorts, that data is worth the setup. In general CPR-C classes with mixed ages and comfort levels, too much screen time can slow momentum. The sweet spot for schools is often a hybrid: one QCPR manikin at a coaching station where students aim for a target score, paired with simpler torsos at other stations to maximize hands-on time. If you run a credit-bearing course or must report performance, log the scores from the QCPR station and use them for remediation or extra practice.
Privacy matters. If you use apps, avoid capturing names in third-party systems and keep devices offline when possible. A paper score sheet tied to student numbers, not names, is enough to track progress without storing personal information on tablets.
Keeping gear clean, safe, and ready
Nothing derails a class faster than a dead battery or a manikin that smells like last week’s workout. Build your maintenance into the teaching calendar. Even with careful use, training airways get damp and pick up residue quickly. Follow the manufacturer’s cleaning guidance, use disinfectants known to be safe for ABS and PVC plastics, and budget for regular replacement of lungs or valves. For hygiene, I still prefer individual face shields during rescue breathing practice in large groups, even when https://messiaheywh146.almoheet-travel.com/emergency-training-equipment-canada-budget-planning-for-2026 manikins have integrated one-way valves.
Here is a simple, sustainable routine that works across school terms and community schedules:
- Before class: test AED trainers, check manikin chest springs and clickers, confirm enough consumables for the roster
- After class: wipe down surfaces, swap or dry airways, recharge or replace batteries, log any broken parts
- Monthly: deep clean with manufacturer-recommended solutions, inventory remaining lungs, valves, and spare pads
- Quarterly: test every AED trainer scenario mode, update app firmware on QCPR devices, check strap integrity on bags
- Annually: review kit against current guidelines from the Heart and Stroke Foundation of Canada or the Canadian Red Cross, retire outdated or damaged items
The Canadian context: language, accessibility, and climate realities
Across much of Canada, bilingual materials are not optional. If you teach in Quebec or bilingual districts, source CPR manikins and AED trainers with prompts or overlays in both English and French. Many AED trainers offer language toggles or sticker sets. Handouts should mirror course content in both languages to keep instructor explanations consistent.
Accessibility shows up in design choices. Choose manikins with clear chest landmarks for visually impaired learners and tactile feedback for students who process information through touch. Provide chairs or mats with extra padding for participants with joint issues. In northern or rural programs, plan for transport in winter conditions and cold storage. Plastics stiffen in unheated vehicles, and AED trainer pads lose adhesion if they freeze. If you store kits off-site, add a note: bring boxes inside several hours before class so materials return to room temperature.
Budgeting with a three-year horizon
Sticker price matters, but consumables and replacement parts decide your total cost of ownership. Disposable lungs or valves range from roughly a dollar to a few dollars per use depending on format and volume discounts. AED training pads vary widely in durability and price, and linty mats reduce lifespan fast. If your program runs weekly, buy spare pads in bulk and allocate a small budget line for pad replacement each term. Springs, clickers, and torsos last years with careful use, but plan for at least one or two component replacements annually in a class set that travels often.
For a Canadian school starting from zero, rough budgets might look like this, acknowledging regional price differences and currency swings:
- Starter kit for a single classroom rotation, portable: three adult manikins, one infant, one AED trainer, barriers, gloves, wipes, and a small bleeding control set. Often lands in the low-to-mid thousands CAD.
- Standard kit for a full class set: six to eight adult torsos, two infants, two AED trainers, multiple barriers and spare airways, plus two bleeding trainers. Expect mid-to-high thousands CAD.
- Advanced kit for BLS or high-frequency training: a mix of QCPR-capable manikins, several AED trainers with remotes, robust bleeding control simulators, choking vests, and extra consumables. Budget can reach into five figures CAD, but output quality and throughput increase meaningfully.
Grant opportunities exist. School boards sometimes access health promotion funds, and municipalities may tap community safety grants. Partnering with local businesses that already maintain public-access AEDs can unlock sponsorships, especially when you align training scenarios with the exact AED models in their buildings.
Where to buy and what to watch for in Canada
Reputable Canadian distributors help with warranty support, parts availability, and timely shipping. The advantage is practical, not just patriotic. A cracked chest plate or a lost AED trainer remote can stall a week of classes. Buying inside Canada shortens the turnaround and avoids customs delays. Ask vendors specifically about lead times on consumables, return policies on training electronics, and bilingual support documentation. If you teach under a larger brand, check whether your program has preferred pricing or pre-approved suppliers to simplify procurement.
Be cautious with deep-discount online marketplaces. I have seen third-party AED training pads that looked fine but lifted mid-scenario, breaking learner focus. Saving a few dollars on consumables does not help when the class loses its rhythm.
Instructor packages that work for real schedules
Pre-built CPR instructor packages Canada vendors offer vary in quality. The best ones match ratios you actually use, include spares for the parts that fail first, and bundle carry solutions that work in tight hallways and on stairs. For example, a thoughtful package for a school might include six adult torsos in a rolling case, two infant manikins in a soft bag, two AED trainers with remotes and extra pads, a compact bleeding kit with a windlass tourniquet and gauze, barriers and gloves, and a bottle of manikin-safe disinfectant. If the offered package swaps an infant for a child torso, confirm that aligns with your curriculum. Many school programs cover adult and infant skills, and child CPR differences can be taught on adult manikins with proper depth and hand placement adjustments.
If you already own manikins, consider AED training equipment Canada sets as a separate purchase. Align them with the AEDs present in your facilities. Some campuses have mixed device fleets after years of separate donations. When that happens, choose trainers that mimic the most prevalent brand, then teach conceptually so learners understand that prompts vary but the steps are the same.
Running efficient classes with limited time
School bell schedules and community centre bookings rarely flex. To get high-quality practice within 60 to 90 minutes, script the physical space. Set stations before students arrive. Pair each adult torso with a barrier and gloves already out of the bag. Place AED trainers at two stations even if you have only one device, and rotate the remote control to trigger different scenarios. For first aid components, keep the bleeding trainer at a separate table so crowd noise from AED prompts does not drown out your instructions.
A simple technique that pays dividends: use a metronome at 110 beats per minute for the first few minutes, then turn it off and let learners internalize the rhythm. Bring it back only if groups drift. For ventilations, teach deliberate, small breaths with visible chest rise, not full lung volumes. Many first-time learners overshoot and end up with gastric inflation. On manikins with visible sensors, show how gentle breaths score better. The combination of tactile learning and immediate feedback sticks, especially in teens.
Common pitfalls and field fixes
Two issues show up constantly: broken adhesive on AED training pads and misfiring clickers on older manikins. For pads, store them on the manufacturer’s plastic backers and keep spare adhesive gel or tape designed for training pads if the vendor supports it. Swapping contact surfaces mid-class is faster than pausing a scenario to beg the pad to stick. For clickers that do not trigger reliably after years of use, check for misaligned chest plates or fatigued springs before you assume the torso is done. Many brands sell spring kits or chest assemblies at a fraction of the cost of a new unit.
On busy days, keep a small “triage” bag: hex keys for chest plate screws, spare lungs or valves, extra manikin faces if yours use them, a roll of gaffer tape for non-adhesive emergencies, and a few AA and AAA batteries. That kit has rescued more classes than any other single item I carry.
Keeping pace with Canadian guidelines
Guidelines shift every five years or so as resuscitation councils update evidence. The Heart and Stroke Foundation of Canada aligns with international bodies, and the Canadian Red Cross and other training agencies update materials accordingly. Your kits do not have to change dramatically with each update, but your teaching should. For example, if compression depth targets or sequence emphasis adjusts, ensure your feedback devices and instructor scripts reflect that. Once a year, block time to review agency updates, watch for recall notices on training devices, and purge any handouts with outdated algorithms.
Final thoughts from the gym floor
The best CPR and first aid training kits pay for themselves in attention and confidence. In a Toronto high school last spring, a shy student who had barely spoken in two months of class nailed a perfect score on a QCPR station, then taught two peers a cleaner hand position. In a Halifax community centre, a seniors’ walking club practiced AED pad placement on a trainer that matched the unit in their lobby, then negotiated with the manager to make the cabinet more visible. Those moments happen when gear gets out of the way and lets learning take centre stage.
If you focus on durable, easy-to-clean CPR training manikins Canada programs can rely on, pair them with AED training equipment Canada instructors can configure to local devices, and assemble CPR instructor packages Canada suppliers can support for years, your courses will run smoother. Add thoughtful first aid components, right-sized storage, and a maintenance routine that fits your calendar. The result is a program that scales across semesters and seasons, from the noise of a grade 10 gym to the quiet of a Tuesday night library room, with learners who leave ready to act when it counts.
CPR Depot Canada — Business Info (NAP)
Name: CPR Depot CanadaAddress: 340 Croft Dr, Tecumseh, ON N8N 2L9
Phone: +1-877-570-7322
Website: https://cpr-depot.ca/
Email: [email protected]
Hours:
Monday: 9:00 AM – 6:00 PM
Tuesday: 9:00 AM – 6:00 PM
Wednesday: 9:00 AM – 6:00 PM
Thursday: 9:00 AM – 6:00 PM
Friday: 9:00 AM – 6:00 PM
Saturday: Closed
Sunday: Closed
Open-location code (Plus Code): 8537+C8 Tecumseh, Ontario
Map/listing URL: https://www.google.com/maps/place/CPR+Depot/@42.3036,-82.8392601,17z/data=!3m1!4b1!4m6!3m5!1s0x883b2aedd5f271a1:0xfee6f8b7ab8f4110!8m2!3d42.3036!4d-82.8366852!16s%2Fg%2F1q6cff15h
Embed iframe:
Socials:
https://www.facebook.com/people/CPR-Depot-Inc/61575911496200/ https://www.instagram.com/cprdepotinc/ https://www.youtube.com/@CPRDepot
https://cpr-depot.ca/
CPR Depot Canada is a supplier of medical training products and related supplies serving customers across Canada.
The business is listed at 340 Croft Dr, Tecumseh, ON N8N 2L9.
To contact CPR Depot Canada, email [email protected] or call +1-877-570-7322.
Hours listed are Monday–Friday 9:00 AM–6:00 PM, with Saturday and Sunday closed.
For directions and listing details, use: https://www.google.com/maps/place/CPR+Depot/@42.3036,-82.8392601,17z/data=!3m1!4b1!4m6!3m5!1s0x883b2aedd5f271a1:0xfee6f8b7ab8f4110!8m2!3d42.3036!4d-82.8366852!16s%2Fg%2F1q6cff15h
Popular Questions About CPR Depot Canada
Where is CPR Depot Canada located?CPR Depot Canada is listed at 340 Croft Dr, Tecumseh, ON N8N 2L9.
What are the hours for CPR Depot Canada?
Hours listed: Monday–Friday 9:00 AM–6:00 PM; Saturday and Sunday closed.
What does CPR Depot Canada sell or provide?
CPR Depot Canada supplies medical and first aid training products and related equipment (product availability varies).
Do they ship across Canada?
The business markets to Canadian customers and operates as a Canada-wide supplier; confirm shipping options at checkout or by contacting [email protected].
How can I contact CPR Depot Canada?
Phone: +1-877-570-7322
Email: [email protected]
Website: https://cpr-depot.ca/
Map: https://www.google.com/maps/place/CPR+Depot/@42.3036,-82.8392601,17z/data=!3m1!4b1!4m6!3m5!1s0x883b2aedd5f271a1:0xfee6f8b7ab8f4110!8m2!3d42.3036!4d-82.8366852!16s%2Fg%2F1q6cff15h
Landmarks Near Tecumseh, ON
1) Tecumseh Town Hall2) Lacasse Park
3) Lakewood Park
4) WFCU Centre (Windsor)
5) Devonshire Mall (Windsor)