Equipping Volunteer Teams: Affordable CPR and First Aid Training Kits in Canada
Volunteer groups carry a lot on their shoulders. Minor hockey coaches, church safety teams, neighborhood emergency hubs, volunteer firefighters on their off days, even the PTA parent who agreed to run a babysitting safety course. They often teach life-saving skills without the budget of a large training agency. The good news is that a solid, durable kit for CPR and first aid training does not have to drain the treasury. With a bit of planning, you can outfit a team to run reliable courses across a school year, keep consumables affordable, and meet Canadian program expectations.
This guide draws on years of outfitting small and mid-sized teams across provinces. It focuses on practical choices, maintenance tricks, and trade-offs that help you teach well, not just own shiny gear that sits in a closet.
Start with your training goals, not a catalog
Before comparing CPR training manikins or drooling over the latest feedback lights, define what you need to achieve. If you are delivering Canadian Red Cross, Heart and Stroke, or Lifesaving Society programs, the competencies are clear. For community groups running non-certification workshops, your goals may be narrower and costs can come down without sacrificing learning.
Ask three simple questions. Who are your learners, and how many per session. Which skills must they leave with, such as adult CPR and AED use only, or adult, child, and infant. Where will you teach, since stairwells, winter arenas, and library basements impose different realities. From those answers you can right-size your kit rather than buying to a manufacturer’s default bundle.
Most volunteer courses aim for 8 to 16 learners per session. A 12-learner model keeps math easy and fits classrooms and community halls. Keep that baseline in mind while we walk through the gear categories.
What Canadian standards mean for your kit
Certification bodies in Canada do not mandate specific brands. They do expect you to provide learners a reasonable manikin-to-student ratio, an AED trainer that mimics Canadian AED prompts, and first aid training supplies that allow hands-on practice. A few practical points matter across provinces:
- Bilingual prompts and labels help. Many AED training equipment Canada options include English and French voice prompts out of the box. If you serve Quebec or bilingual communities, verify before buying.
- Follow Infection Prevention and Control practices. Health Canada recognizes accelerated hydrogen peroxide and quaternary ammonium disinfectants commonly used in classrooms. Your cleaning plan should be quick between rotations and deeper after courses.
- Compressions and ventilation feedback are encouraged where possible. You do not need high-end Bluetooth manikins. Simple visible chest rise and clickers, paired with an instructor’s eye, still produce excellent outcomes.
Keep receipts and user manuals. Many municipalities and insurers ask for documentation when approving training activity.
CPR training manikins Canada: types, counts, and durability
Manikins are the heart of your kit. The market ranges from no-frills torsos to fully instrumented systems. The right choice for a volunteer team balances realism, storage, and long-term consumable costs.
Adult torsos form your base. For a 12-learner class, aim for 4 adult manikins. That keeps practice cadence brisk without blowing the budget. Compact foam torsos cost less and pack tight, but hollow shells with spring mechanisms last longer under heavy use. Expect reliable adult manikins to run roughly 180 to 400 CAD each when purchased in Canada, with discounts for 4-packs.
Feedback features are helpful, not mandatory. LED indicators for depth and rate give instant reinforcement that frees the instructor to coach breathing and hand placement. Battery-powered modules add maintenance tasks, replacing coin cells or AA batteries every few months. If you teach monthly, the payoff is worth it. If you teach twice a year, a clicker chest and metronome track get you 90 percent of the benefit for half the price.
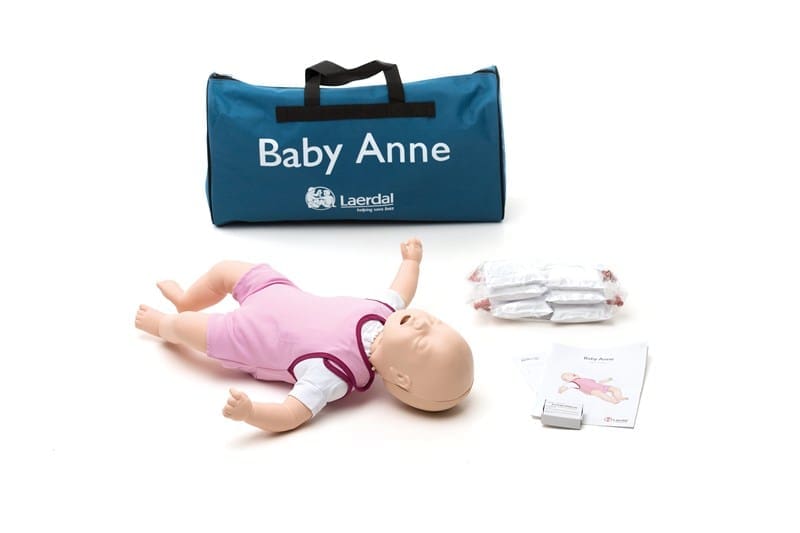
Infant manikins convert hesitant learners into confident caregivers. If your audience includes parents, day camp leaders, or babysitters, you need two infant manikins minimum. The smaller body size changes compression technique and breath volume dramatically. A good infant manikin in Canada is often 170 to 300 CAD. Choose a model with easy airway replacement. Toddler or child torsos come next if your curriculum requires them. Two child torsos shared among 12 learners works fine.
Consumables drive long-term cost. Most budget manikins use disposable lungs and face shields. Plan on one lung per learner per course if you mix mouth-to-mouth practice with barrier devices. Some models accept washable lungs or allow bag-mask only, which lowers costs further. Price check lungs and one-way valves before you commit to a brand. A pack of 100 lungs usually runs 90 to 150 CAD. Valve masks for instructor demos can be cleaned and reused with proper disinfection.
Durability matters more than fancy design when gear lives in the trunk of a car. Avoid textured skin overlays that tear, fabric torsos that trap disinfectant, and complex latch systems that crack in cold weather. In Saskatchewan winter, I watched a cheap torso collar snap at minus 15 Celsius while unloading in a parking lot. Smooth ABS housings handle temperature swings better and wipe down quickly.
Manikin maintenance should be routine, not a chore. Build a cleaning rhythm. Wipe surfaces with an accelerated hydrogen peroxide wipe after each rotation, swap lungs when changing learner groups, and keep a soft brush for debris in the chest spring area. Once a quarter, open chests, vacuum dust, and inspect springs. Mark units with a number so you can track issues. A small roll of colored tape on the base quick-tags problem units for later.
AED training equipment Canada: what actually matters
An AED trainer teaches more than button pushes, it builds the confidence to open a cabinet and act. For community teams, you do not need a one-to-one match to every brand on the market. You do need a trainer that mirrors the rhythm of Canadian devices and lets learners make decisions without the machine doing all the thinking.
Choose a trainer with adjustable scenarios. Shock advised, no shock advised, pediatric mode, low battery prompts, and voice prompt volume control cover almost all teaching needs. Bilingual voice options reduce friction in mixed classes. Many trainers ship with English only by default, and a small dip switch changes to French. Test it before class day.
Pad design affects cost. Replaceable, repositionable pads cost more up front but last several classes. Some budget trainers use sticky pads that degrade quickly on textured manikins. Keep a small spray bottle of water and a microfiber cloth to refresh adhesion between groups. A spare set of lead wires prevents a small tear from cancelling your day.
Compatibility is more about workflow than brand. If your community has mostly Zoll or Philips public access units, borrow one for show-and-tell and use a generic trainer for repetitions. It is illegal and unsafe to train with a live AED connected to a person, so never try to repurpose a clinical unit for practice. Trainer units run 160 to 400 CAD, with replacement pads at 20 to 60 CAD per set. Buy one trainer per two groups of learners so nobody waits too long. For a 12-person class, two AED trainers keep the pace smooth.
If you teach in noisy gyms or outdoors, prioritize trainers with bright indicator lights and a pause button so you can instruct over the prompts. Cold weather stiffens pad gel. Storing pads inside your https://jsbin.com/putolovola jacket for the first hour of a winter session avoids constant peeling headaches.
First aid skills equipment that pulls its weight
A good CPR and first aid training kit goes beyond compressions. Learners should wrap an ankle, apply a triangular bandage, and practice gloved wound care without you digging through a chaotic bin.
Focus on reusable anchors. Elastic bandages that can survive 20 classes, splints that reshape without cracking, and tourniquets designed for training, clearly marked as non-clinical. Use blue or high-visibility training tourniquets so they never migrate into a real first aid kit by accident. Pair them with a short talk on appropriate use. Compression wraps, gauze rolls, and triangular bandages should reflect what learners will find in common Canadian first aid kits.
Include a trainer epinephrine auto-injector if your audience includes teachers, coaches, or childcare workers. Trainer devices are inert and allow safe repetition of the motion, cap off, jab to thigh, hold, massage. Add an inhaler trainer with a spacer if asthma emergencies are in scope. In some provinces, naloxone training is common in community centers. The nasal trainer kits teach the steps without medication.
Gloves and barriers belong at the top of the bin, not the bottom. Nitrile gloves in multiple sizes and face shields, ideally one per learner, normalize personal protection. Learners practice properly removing gloves and disposing of them. The habit sticks.
For wound simulation, simplicity beats cinema. A quarter cup of cornstarch mixed with water and a drop of red food coloring thickens into decent fake blood that rinses from manikins and bandages. Keep it off porous surfaces. If you prefer commercial moulage, remember it adds setup and cleanup time that can swallow your break.
CPR instructor packages Canada: when bundles make sense
Many Canadian suppliers offer CPR instructor packages Canada wide, bundling manikins, AED trainers, and first aid supplies. Bundles can save 10 to 25 percent compared to piecemeal orders, especially once you include shipping. The best-value bundles usually include three or four adult manikins, one infant, one AED trainer, lungs and wipes for the first 100 students, and a carry bag.
Watch for filler. Some packages pad the count with flimsy triangular bandages, dated pocket masks, or oddly sized gloves. A smarter play is a smaller core bundle plus targeted add-ons. If a vendor lets you swap manikin models or choose bilingual AED prompts at the same price, take it. Ask whether the bundle includes a written quote showing each component. Grants and corporate donors often require line items.
On the ground, I have seen small town teams buy one solid bundle to get rolling, then add a second infant manikin and extra lungs once their first season fills. That staged approach keeps cash flow painless and avoids storage headaches before you even test your teaching rhythm.
One compact kit for a 12-learner community course
- 4 adult CPR training manikins with clicker or basic LED feedback, plus 100 disposable lungs and 50 face shields
- 2 infant manikins with replaceable airways
- 2 AED training equipment units with bilingual prompts and two sets of reusable training pads each
- A first aid training pack: 8 elastic bandages, 8 triangular bandages, 12 gauze rolls, 4 SAM-style splints, 2 blue training tourniquets, 12 pairs of nitrile gloves per class, 2 trainer epinephrine auto-injectors, 1 inhaler trainer with spacer
- Cleaning and logistics: 2 tubs of accelerated hydrogen peroxide wipes, 1 bottle of surface spray, 40-liter tote with locking lid, laminated checklists, roll of painter’s tape for labeling
That setup fits in a mid-sized rolling tote and a soft duffel, leaves room for a laptop or laminated skill sheets, and resets quickly between sessions.

Buying in Canada: price, shipping, and availability
Sourcing inside Canada avoids border delays, currency swings, and brokerage fees that can surprise you when ordering from abroad. Look for vendors who stock parts and consumables year round rather than drop-shipping every item. A manikin without lungs is a doorstop.
Shipping matters across a big country. Western and Atlantic communities should price in transit time and cost. Carriers treat manikin boxes as oversized, so a seemingly free shipping offer may have a minimum order size or remote area surcharge. Ask about pallet options if your program grows. A single pallet with eight adult torsos and consumables often costs less to ship than three separate boxes over a season.
If you are in the North, consider batch orders twice a year. I work with a Yukon volunteer group that orders in August for the fall term and again in February, skipping the holiday rush and spring thaw delivery chaos. They also ask vendors to pack consumables inside manikin cartons to reduce dimensional weight, a trick that keeps costs predictable.
Stretching the budget without cutting educational corners
- Choose mid-tier manikins with replaceable lungs rather than premium Bluetooth-linked models. Pair them with a free metronome app and hands-on coaching.
- Buy one AED trainer with two pad sets first, and add a second trainer once courses fill. In early sessions, rotate groups, assigning roles so learners stay engaged while they wait.
- Standardize on one manikin brand to simplify lungs, faces, and head parts. Mixed fleets are fine, but they complicate restocking and raise error risk.
- Apply for micro-grants. Municipal safety committees, local insurers, service clubs, and school boards often fund 500 to 2,500 CAD requests for training gear if you offer community access.
- Build a consumable fee into course pricing, even for free public sessions. A suggested donation of 5 to 10 CAD per attendee covers lungs, wipes, and gloves while keeping training accessible.
Small, consistent choices like these stretch funds across years. Spend where it shapes learner outcomes - a second AED trainer if your classes run long due to bottlenecks, or infant manikins if your audience includes childcare workers.
Cleaning, storage, and the unglamorous work that protects your investment
A trustworthy kit is a clean kit. Learners notice when equipment smells like last month’s class. Your disinfectant needs to be effective, quick, and kind to plastics. Accelerated hydrogen peroxide wipes clean in 1 to 5 minutes and do not leave sticky residue. Avoid bleach on manikins. It pits plastic, clouds faces, and weakens springs over time.
Between rotations, a wipe on touch surfaces and a swap of lungs is usually enough. After class, deep clean. Remove heads, rinse or replace airways per the manufacturer, and let parts dry fully before storage. Moisture trapped in torsos grows odours fast. A small mesh bag holds lungs and valves while they air dry, and it packs neatly.
Storage should prevent dents and tangles. Hard-sided totes protect AED trainers and pad cables. Keep manikins in their soft bags or stack carefully to avoid crushing jaw hinges. Label everything. A laminated card in each bag lists contents, last clean date, and missing items. I put a cheap headlamp in the AED trainer case. It has saved me in dim community halls more than once.
Seasonal realities matter. In winter, bring gear indoors the night before. Cold plastic goes brittle, adhesives lose tack, and batteries sag. In summer, do not leave kits in a hot vehicle all day. Excessive heat warps pad gel and discolors manikin faces. A simple rule of thumb, if you would not leave a chocolate bar there, do not leave your training kit there either.
Teaching flow: the hidden cost driver
Even the best kit fails if your session bogs down. Pacing, stations, and role assignments reduce wait time and wear on gear. Set up parallel stations: two for compressions and breaths, one for AED use, one for recovery position and first aid. Rotate groups every 10 to 12 minutes. Learners in the queue perform compressions on the table edge to the beat of your metronome. They are still practicing, your manikins get micro-breaks, and nobody stands idle.
Use roles. Compressor, ventilator, AED operator, scene manager. Each learner rotates through every role. When they return to a station they have done before, layer difficulty - add a bystander who talks over them, toss in a wet surface scenario, or cut the lights for a minute. The challenge engages minds as much as muscles without needing more equipment.
Edge cases you will thank yourself for planning
Not every class happens in a bright, quiet room on a temperate day. Outdoor sessions at community fairs, winter drills in rinks, and rural sites with no power ask more of your kit.
For outdoor settings, bring weight. A couple of canvas bags filled with rice or sand stop manikins and AED pads from sliding on grass or asphalt. A groundsheet keeps learners from soaking their knees. Wind eats paper skill sheets, so laminate and tie them with paracord to the table legs.
In cold spaces, warm your pads in an inner pocket and do a shorter first rotation so nobody wrestles with peeling. Keep spare batteries in a close pocket as well. For power outages or off-grid sites, ensure your AED trainers run on AA or AAA batteries, not proprietary rechargeables you forgot to charge. A compact Bluetooth speaker with a metronome app cuts through echoey rooms.
For rural communities with intermittent internet, skip feedback platforms that require live syncing or app logins. Stick with devices that show indicators locally. You will not miss the data export as much as you think, and you reduce your setup time to near zero.
Where Emergency training equipment Canada fits in
Beyond classroom kits, some teams support community emergency exercises or deploy pop-up training booths at events. Emergency training equipment Canada suppliers carry larger items such as CPR feedback monitors, full-body trauma manikins, and scenario kits with triage tags and radios. Those are nice-to-have for drills or advanced programs. For volunteer teams running core CPR and first aid, you can borrow larger items from municipal emergency management during joint exercises and keep your own kit lean.
If your team doubles as an emergency hub, consider adding durable signage, a folding table, and a basic shelter to your training inventory. These items improve visibility at community events and allow quick transitions from training to information sessions during response periods.
Buying used, borrowing, and sharing
Pre-owned manikins can be a bargain if you inspect them closely. Check chest recoil, jaw hinges, airway patency, and compatibility with current lungs and masks. Verify that replacement parts are still sold in Canada. A cheap torso with discontinued lungs turns into a repair project. Expect to replace all internal airways and surface valves on used units as a starting cost.
Borrowing works. Pair up with a neighboring fire hall, school, or another nonprofit. Write a simple lending agreement that covers cleaning responsibilities and a plan if something breaks. Shared calendars prevent clashes on busy weekends.
Regional training networks help with instructor coverage and large events. I know one Ontario county where four volunteer groups share a WhatsApp channel listing gear inventories and course dates. When a big corporate client booked a 36-person class on short notice, they pooled manikins and instructors, split the fee, and each team walked away with funds for upgrades.
CPR and first aid training kits: putting it all together
The phrase CPR and first aid training kits suggests a single product, but the best kits evolve. Start with core manikins that hold up to travel, a dependable AED trainer or two with bilingual prompts, and a tidy first aid skills set that resists wear. Layer in feedback features when you see confusion you cannot coach through. Add more infant units when demand justifies it. Replace consumables in bulk and track usage per class.
What matters most is that your equipment supports your teaching rhythm, not the other way around. A dozen learners moving confidently through stations learn more and break less. A clear cleaning loop keeps your kit inviting. A storage plan prevents the late-night scramble for missing pads.
Volunteer teams make the early interventions that change stories. With a smart purchase plan, a simple maintenance habit, and a bias for practical over flashy, you can deliver high-quality training month after month on a modest budget. And when a parent later says they felt calm using a public AED after your course, that kit will feel priceless.
CPR Depot Canada — Business Info (NAP)
Name: CPR Depot CanadaAddress: 340 Croft Dr, Tecumseh, ON N8N 2L9
Phone: +1-877-570-7322
Website: https://cpr-depot.ca/
Email: [email protected]
Hours:
Monday: 9:00 AM – 6:00 PM
Tuesday: 9:00 AM – 6:00 PM
Wednesday: 9:00 AM – 6:00 PM
Thursday: 9:00 AM – 6:00 PM
Friday: 9:00 AM – 6:00 PM
Saturday: Closed
Sunday: Closed
Open-location code (Plus Code): 8537+C8 Tecumseh, Ontario
Map/listing URL: https://www.google.com/maps/place/CPR+Depot/@42.3036,-82.8392601,17z/data=!3m1!4b1!4m6!3m5!1s0x883b2aedd5f271a1:0xfee6f8b7ab8f4110!8m2!3d42.3036!4d-82.8366852!16s%2Fg%2F1q6cff15h
Embed iframe:
Socials:
https://www.facebook.com/people/CPR-Depot-Inc/61575911496200/ https://www.instagram.com/cprdepotinc/ https://www.youtube.com/@CPRDepot
https://cpr-depot.ca/
CPR Depot Canada is a supplier of medical training products and related supplies serving customers across Canada.
The business is listed at 340 Croft Dr, Tecumseh, ON N8N 2L9.
To contact CPR Depot Canada, email [email protected] or call +1-877-570-7322.
Hours listed are Monday–Friday 9:00 AM–6:00 PM, with Saturday and Sunday closed.
For directions and listing details, use: https://www.google.com/maps/place/CPR+Depot/@42.3036,-82.8392601,17z/data=!3m1!4b1!4m6!3m5!1s0x883b2aedd5f271a1:0xfee6f8b7ab8f4110!8m2!3d42.3036!4d-82.8366852!16s%2Fg%2F1q6cff15h
Popular Questions About CPR Depot Canada
Where is CPR Depot Canada located?CPR Depot Canada is listed at 340 Croft Dr, Tecumseh, ON N8N 2L9.
What are the hours for CPR Depot Canada?
Hours listed: Monday–Friday 9:00 AM–6:00 PM; Saturday and Sunday closed.
What does CPR Depot Canada sell or provide?
CPR Depot Canada supplies medical and first aid training products and related equipment (product availability varies).
Do they ship across Canada?
The business markets to Canadian customers and operates as a Canada-wide supplier; confirm shipping options at checkout or by contacting [email protected].
How can I contact CPR Depot Canada?
Phone: +1-877-570-7322
Email: [email protected]
Website: https://cpr-depot.ca/
Map: https://www.google.com/maps/place/CPR+Depot/@42.3036,-82.8392601,17z/data=!3m1!4b1!4m6!3m5!1s0x883b2aedd5f271a1:0xfee6f8b7ab8f4110!8m2!3d42.3036!4d-82.8366852!16s%2Fg%2F1q6cff15h
Landmarks Near Tecumseh, ON
1) Tecumseh Town Hall2) Lacasse Park
3) Lakewood Park
4) WFCU Centre (Windsor)
5) Devonshire Mall (Windsor)